Vinyl Skirting Installation Instructions
The Manufacturer (MANF) of
this product has provided these instructions as installation
guidelines. (MANF) however, neither installs nor has
any control over the installation. It is the responsibility of
the purchaser and/or installer to insure the product is
installed in accordance with these instructions and any
applicable building codes. MANF assumes no liability
for either improper installation or personal injury resulting
from improper use or installation.
|
Installation of your skirting system requires tools
you are likely to already own. You will need a
hammer, plumb bob or level, measuring tape, tin
snips, chalk line and a snap lock punch tool.
|
|---|
|
1. For optimal performance, we do not recommend the
installation of vinyl skirting pnels exceeding 48"
in height.
2. To maintain beauty, simply clean with soap and water. 3.Do not paint your skirting. This is not necessary and will void the warranty. 4. To keep grass and vegitation growth away from the skirting, place six to eight inches of metal roof flashing on the ground around the perimeter and center the bottom rail down the middle. 5. Do not allow line trimmers to contact your skirting, as this will result in damage. |
|---|
|
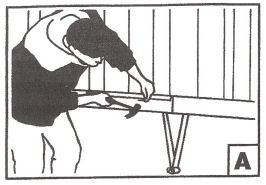
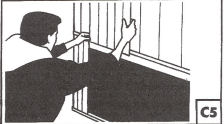
1. Determine a place for mounting. Place bottom edge
of the back rail just below bottom edge of the home.
This location must offer solid support for attaching
and wind load pressure for panels and rails.
2. Keep the back rail straight and level. Snap a chalk line around the home to guide the top edge of the back rail. 3. Correct screwing or nailing method for back rail: Start on the back side of the home. Position screws or nails in the center of the slot. Screw/nail to allow for a clearance of 1/16" from the back rail surface. Note: Avoid tightly screwing or nailing back rail. A 1/16" clearance allows for normal expansion and contraction with temperature change. Place a screw or nail in every other slot. 4. Provide a 1/2" gap between each back rail section for normal thermal expansion. Note: To install around corners, refer to step E. |
 |
|---|
|
1. Ground preparation: Prepare the ground so that it
is smooth, free of loose clumps, clods or protruding
obstacles. Guard against uneven settling of newly
excavated ground by mounting the bottom rail on
treated 2"x2" lumber.
2. Mark the ground location directly below the outside, bottom edge of the home. Use a level or plumb bob to determine this location at each corner. 3. Snap a chalk line or stretch a nylon string between each corner to guide the bottom rail. 4. Position the bottom rail with the back leg toward the inside of the chalk line perimeter. 5. Drive ground spikes every 19 inches. Two sets of holes are provided in the bottom rail. The are located inside the channel, and on the back leg. Ground spikes may be driven in either hole at intervals of 19 inches. 6. Installation on concrete: Use a 3/4" masonary nail. You may also drill a hole for a 3/16" molly screw and plastic sleeve (available at hardware stores). Note: To install around corners, refer to step E. |
 |
|---|
|
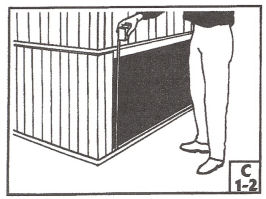
1. Beginning 24" away from the lowest corner of the
home, measure from the ground up to 1 1/2" above the
bottom edge of the back rail. (If temperature is
below 40 degrees F, with frozen ground, measure to
3" above the back rail edge.)
2. Measurements on sloping ground should be taken every 16" (width of panel). 3. Cut the bottom of each panel to angle with the ground. Each cut panel section should align 90 degrees to the bottom edge of the home. Use aviation snips or a power saw (with a fine toothed saw blade turned backwards) for cutting. 4. Using a Snap Lock Punch Tool, punch lock tabs every 4" along the top and bottom edge of cut panel sections. Tabs are to be positioned outward to catch on the hooked edge of the rails. 5. Interlock panels and insert into the bottom rail. Begin with the first panel inserted into the bottom rail. Lock tabs should snap past the hooked edge of the bottom rail. Insert next panel section into the interlock hooks along the vertical edge of the panels. Seat each panel securely into the bottom rail. Repeat interlocking panels, forming about a 12 ft. section. Resume panel cut and interlock method. Note: To install around corners, refer to step E. |
 |
|---|
 |
  |
|---|
|
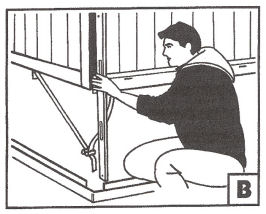
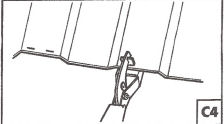
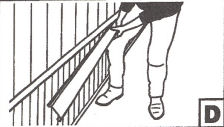
1. Start snapping one end of the front top rail into
thew back top rail, creating the interlock. Push the
front top rail upward, its entire length until the
front top rail is completely interlocked with the
back rail.
2. Overlap 1 inch each top rail section. Note: To install around corners, refer to step E. |
 |
|---|
|
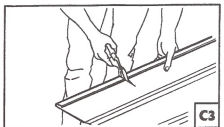
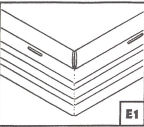
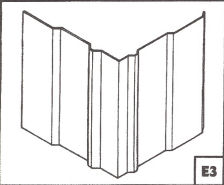
1. Top Back Rail: Make a 1 inch vertical slit from
the top. Top interlock hook should be completely cut
through. Notch 45 degrees on bottom curved leg.
2. Bottom Rail: Notch the back portion with snips, as illustrated. Bend around a corner and attach to the ground. 3. Panels: Cut panel to proper height. Determine point of corner bend; bend over a table edge, forming a uniform angle. 4. Top Front Rail: Notch at both the top and bottom hooks of the front rail as illustrated. Bend around the corner and fit into the interlock with the top back rail. Refer to step D. Note: Pre-notched top front rails may be included. |
 |
|---|
 |
 |
 |
|---|